Spring3 DIでHello World
開発環境も整ったところで、定番のHello WorldをSpring3のDIを使ってやってみました。
[File]-[New]-[Spring Template Project]を選択して「New Template Project」ウィザードを起動します。
①「Simple Spring Utility Project」を選択して[Next]ボタン押下
②[Project name]に「HelloWorld」、top-level packageに「jp.org.tomotaro」を入力して[Finish]ボタン押下
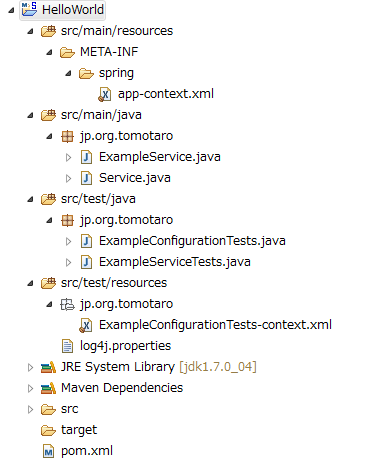
すると、次のようなファイル群が生成されます。
app-context.xmlがアプリケーションの構成ファイルであり、下記のような内容となっています。
<?xml version="1.0" encoding="UTF-8"?>
<beans xmlns="http://www.springframework.org/schema/beans"
	xmlns:xsi="http://www.w3.org/2001/XMLSchema-instance"
	xmlns:context="http://www.springframework.org/schema/context"
	xsi:schemaLocation="http://www.springframework.org/schema/beans http://www.springframework.org/schema/beans/spring-beans-3.0.xsd
		http://www.springframework.org/schema/context http://www.springframework.org/schema/context/spring-context-3.0.xsd">

	<description>Example configuration to get you started.</description>

	<context:component-scan base-package="jp.org.tomotaro" />

</beans>
context:component-scanタグでBeanをjp.org.tomotaroパッケージから検索することを指定しています。
Service.javaは下記のような内容のインタフェースです。
package jp.org.tomotaro;

public interface Service {
	String getMessage();
}
getMessageメソッドのみを定義しています。
ExampleService.javaがServiceインタフェースの実装クラスです。
package jp.org.tomotaro;

import org.springframework.stereotype.Component;

@Component
public class ExampleService implements Service {
	public String getMessage() {
		return "Hello world!";
	}
}
getMessageメソッドで「Hello world!」という文字列を返しているだけです。
注目すべきは@Componentアノテーションです。このアノテーションを付けることによって、component-scanの検索対象のBeanとなります。
ExampleConfigurationTests.javaとExampleServiceTests.javaはExampleSerivseクラスのJUnitテストケースです。
それぞれを選択して右クリックでコンテキストメニューを開き、[Run As]-[JUnit Test]を選択してJUnitを走らせてみると、テストが成功すると思います。
それでは、Serviceを利用するアプリケーションを作りましょう。
[File]-[New]-[Class]メニューでMain.javaを生成して、下記のように入力します。
package jp.org.tomotaro;

import org.springframework.beans.factory.annotation.Autowired;
import org.springframework.context.ApplicationContext;
import org.springframework.context.support.ClassPathXmlApplicationContext;
import org.springframework.stereotype.Component;

@Component
public class Main {
	@Autowired
	private Service service;

	public void sayHello() {
		System.out.println(service.getMessage());
	}

	public static void main(String[] args) {
		ApplicationContext appContext =
				new ClassPathXmlApplicationContext("classpath:./META-INF/spring/app-context.xml");
		Main main = appContext.getBean(Main.class);
		main.sayHello();
	}
}
mainメソッドでは、app-context.xmlを読み込んでApplicationContextを生成し、MainクラスのBeanを取得してsayHelloメソッドを呼び出しています。
sayHelloメソッドでは@Autowiredアノテーションで自動的にインジェクトされたServiceインタフェース実装オブジェクトのgetMessageメソッドで取得したメッセージをコンソールに表示しています。
app-context.xmlでBeanのスキャン対象を「jp.org.tomotaro」にしているので、serviceにはExampleServiceのインスタンスが生成・挿入されます。
実行してみると、コンソールに「Hello world!」と無事表示されました。
しかし、mainメソッドに
System.out.println("Hello world!");
と1行書くだけのプログラムと見た目の動作自体は変わりませんが、なぜこんな回りくどいことをするんでしょうか?
以下のようなjp.org.tomotaro.stub.ServiceStub.javaを作ってみましょう。
package jp.org.tomotaro.stub;

import jp.org.tomotaro.Service;

import org.springframework.stereotype.Component;

@Component
public class ServiceStub implements Service {
	public String getMessage() {
		return "This is a Stub of Service.";
	}
}
そして、app-context.xmlを下記のように書き換えます。
<?xml version="1.0" encoding="UTF-8"?>
<beans xmlns="http://www.springframework.org/schema/beans"
	xmlns:xsi="http://www.w3.org/2001/XMLSchema-instance"
	xmlns:context="http://www.springframework.org/schema/context"
	xsi:schemaLocation="http://www.springframework.org/schema/beans http://www.springframework.org/schema/beans/spring-beans-3.0.xsd
		http://www.springframework.org/schema/context http://www.springframework.org/schema/context/spring-context-3.0.xsd">

	<description>Example configuration to get you started.</description>

	<context:component-scan base-package="jp.org.tomotaro.stub" />
	<bean id="main" class="jp.org.tomotaro.Main" />

</beans>
Beanの検索対象を「jp.org.tomotaro.stub」に変更しました。
しかし、これだとMainクラスのBeanが検索できないので、beanタグを追加しました。
実行してみると、コンソールに「This is a Stub of Service.」と表示されました。
mainメソッドに直接System.out.println(...);と書いていると、プログラムそのものを修正する必要がありますが、DIを利用すると設定だけで実装を切り替えることが出来ます。
単体試験時にはDAOをスタブに切り替えたいといった場面などに重宝します。
ちなみに、Beanの検索はcomponent-scanで指定したパッケージ以下のBeanを検索するようです。つまり、サブパッケージ内のBeanも検索されると言うことです。
ですので、この状態でcomponent-scanを「jp.org.tomotaro」に戻すと、Serviceインタフェース実装クラスが複数見つかったと言う意味の例外が発生します。
従いまして、ExampleServiceのパッケージをjp.org.tomotaro.exampleに変更し、component-scanには「jp.org.tomotaro.example」を指定するようにしました。
(次回はAOPに挑戦。つづく)
※しかし、なんでソースコードの字が小さくって、行間が開いてしまうんかなぁ???誰か解決方法を知っていたら教えてください。m(__)m
